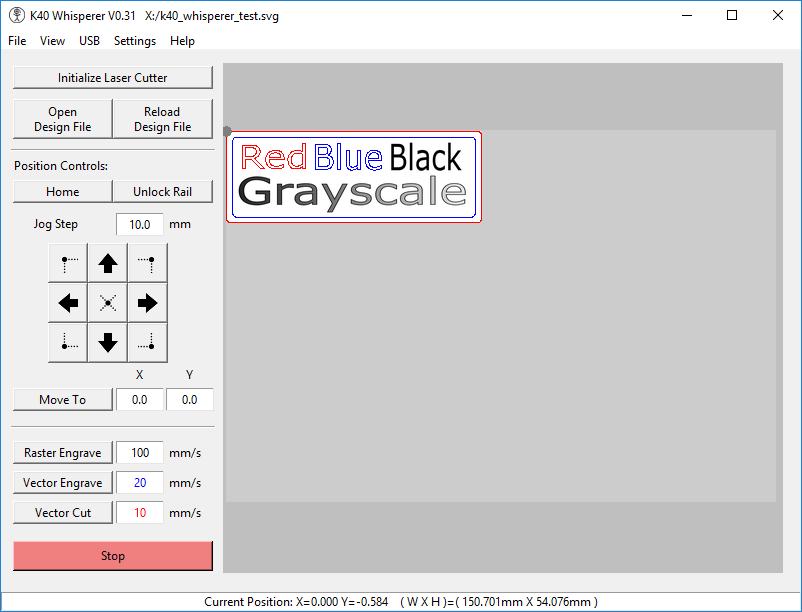
1. Create your design in Inkscape.- Use RED lines to indicate cutting.2. Adjust the size of the document to match the area you want to export.
- Use BLUE lines to indicate vector engraving.
- Use BLACK to indicate raster engraving (this can be shapes, paths or images)- Use "File" - "Document Properties" - "Resize Page to Content" to make the page the same size as your design.3. Within Inkscape select "Save" to save the design as an SVG file.
4. Open the SVG file you just saved in K40 Whisperer.
| Use the smallest Inkscape page size that is practical for your design. | K40 Whisperer will respond much slower if you make your page size large. The larger the page area when you import into K40 Whisperer the slower the program will respond. |
| Watch the Videos | A lot of information is covered in the videos linked on the K40 Whisperer web page. Until the written documentation catches up the videos are the best source of information. |
It depends. Generally there are two reasons that items are not recognized as vector items.
1. The color is not set correctly. The color for vector cut should be (255,0,0) red=255, green=0 and blue=0. The color for vector engrave should be (0,0,255). The colors can be incorrect by a value up to 9 so (246,9,9) will still register as vector cut. Double check your colors if the items are not recognized.
2. Only Stroke features can be vector cut or vector engrave. If the fill color is set to red or blue it will not result in vector features. To engrave a fill you need to use raster engrave.
Some additional information on colors and text can be found here: Vector Colors and Text in K40 Whisperer
The stop button is always red. It is a red Pause/Stop button that never changes color. You click it to pause a currently running job then you confirm if you want to stop the job or cancel to resume.
To start an operation you need to click the "Raster Engrave", "Vector Engrave" or "Vector Cut" button. This video is very helpful if you are just starting out Making a Design in Inkscape for K40 Whisperer
The driver that K40 Whisperer uses to control the laser is different from the default driver that windows installs. (Laser Draw uses the default driver.) In order to use K40 Whisperer you need to install the libUSB driver.
The driver installation procedure is located here: Windows K40 Whisperer Setup
After you have installed the LibUSB driver Laser Draw (LaserDRW) will not work unless you remove the LibUSB driver and reinstall the default driver.
The timeouts error is an indication that the computer has lost its connection to the controller board. Why this happens for some people and not others I do not know. There has not been one single answer. Some people find that switching the USB port helps. Some people say a better USB cable helps.
My theory on this is that there is some sort of electrical noise or interference that is causing the loss of communication between the computer and laser cutter. A couple of potential sources of interference are arcing at the laser tube caused by coolant that is too conductive or a particularly noisy/dirty (electrically speaking) power supply.
If you are up for an experiment you could try running the same job that keeps failing with the laser enable switched off. If the job runs through to the end that might indicate that the power going to the laser tube is involved in the timeout problem.
It seems that Laser Draw (LaserDRW) is less sensitive to the timeout issue so there is probably some improvements that could be made to K40 Whisperer.
Your laser might not be turned on. If you are running Linux you might not have given yourself the correct permissions to access the USB port/device. Try running K40 Whisperer using sudo (or as root). If it works using sudo then it is definitely a permissions issue.
K40 Whisperer runs Inkscape in the background to generate raster data for SVG files. When you get an Inkscape execution failed error it indicates that something went wrong when K40 Whisperer tried to run Inkscape. This particular error occurs if K40 Whisperer found the Inkscape executable and it failed to run. The most common problem that causes this error is that an entry has been made in the "Inkscape Executable" field that points to a file that is not an Inkscape executable. Entering a path to a desktop shortcut is a sure way to get this error.
Here are a few steps to try to resolve this error:
1. Make sure you have Inkscape installed (Inkscape Version .91 or newer is best, Version .47 will work with some limitations.)
2. Look at the "Inkscape Executable" entry field in the General Settings window. Generally the field for "Inkscape Executable" should be blank. If there is anything in that field delete it then click on the "Save" button next to "Configuration File" so the setting is remembered for future K40 Whisperer sessions.
3. After you have deleted any text in the "Inkscape Executable" field try loading an SVG file. For trouble shooting you might want to try loading this test SVG file: k40_whisperer_test.svg.
4. If the file does not load try rebooting your computer. There is a chance that an Inkscape process is hung up and preventing K40 Whisperer from running Inkscape.
5. If you are still getting the error you can try setting the "Inkscape Executable" path to direct K40 Whisperer directly to the Inkscape executable. To do this you click on the "Find Inkscape" button in the "General Settings" window and navigate to the Inkscape executable file on your system. Generally the executable will be in on of these locations:"C:\Program Files\Inkscape\inkscape.exe" (Windows)Do not navigate to a shortcut to the executable file. Selecting a shortcut will cause Inkscape execution to fail. Once you have navigated to the Inkscape executable you can select the file and the entry field will be populated with the path. At this point you can again try loading an SVG file. If it still does not work you can test the path you entered by copying the path and paste it into a command line window. If the executable does not work from the command line you need to fix your Inkscape installation.
"C:\Program Files (x86)\Inkscape\inkscape.exe" (Windows)
"/usr/bin/inkscape" (Linux)
"/usr/local/bin/inkscape" (Linux)
"/Applications/Inkscape.app/Contents/Resources/bin/inkscape" (Mac)
Raster data is not supported with the DXF import format. Everything in a DXF file will come in as vector cut unless the color is blue or the features are on a layer with "engrave" in the name. In that case the features will come in as vector engrave. (Text is also not supported in DXF files.)
Here is a link to a blog post covering this issue: Input SVG File Errors
| F1 | Open the Help dialog box. |
| F2 | Opens General Settings Window |
| F3 | Opens Raster Settings Window |
| F4 | Opens Advanced Settings |
| F5 | Refreshes items displayed in the main window. |
| Home (or Ctrl-h) | Home Laser |
| Ctrl-Up Arrow | Jog Laser up |
| Ctrl-Down Arrow | Jog Laser Down |
| Ctrl-Right Arrow | Jog Laser Right |
| Ctrl-Left Arrow | Jog Laser Left |
| Ctrl-i | Initialize Laser |
| Ctrl-o | Open Design File |
| Ctrl-l | Reload Current Design File |
| Ctrl-u |
Unlock Laser Head (Unlock Rail) Turns the stepper motors attached to the X and Y axes off. This allows the user to move the laser head manually. |
| Escape |
Stop Current Job (The current job will be paused and a dialog will open with the option to resume or kill the remainder of the job. |
| k40_whisperer.txt |
When K40 Whisperer starts up it looks for a file named "k40_whisperer.txt". If the file is found it is read and all of the K40 Whisperer options are set according to the settings saved in the configuration file. K40 Whisperer looks for the configuration file in the current directory and in the users home directory (the default save directory). Only the first configuration file found is read. To create a configuration file with your preferred options for startup just open K40 Whisperer and change the settings to your liking then save a configuration file by clicking the save button next to configuration file in the general settings window. |
| Item | Description |
| Initialize Laser | Establish connection with the laser controller board, and optionally Home the laser depending on the setting in the General settings window for "Home Upon initialize" |
| Open Design File |
Opens a dialog box to select a design file to open.
K40 Whisperer can open SVG, DXF and G-Code files using file open. |
| Reload Design File | Reloads the current design. (Re-read the design file information from the storage location) |
| Home | Sends the laser to its Home position. |
| Unlock Rail | Turns the stepper motors attached to the X and Y axes off. This allows the user to move the laser head manually. |
| Jog Step | The distance the laser head will move when the laser head is moved (jogged) when the arrow buttons are pressed. |
| Arrows | The four arrow buttons move (jog) the laser head in the indicated direction the distance entered in the Jog Step entry field. |
| Corners and Center | The four corner buttons and the center button are used to move the laser head to the corners of the loaded design. This is useful to verify that the design will fit in the space available on the material you are using. |
| Move To | The Move To button will home the laser then move the laser head to the X and Y position entered in the X and Y fields. |
| Raster Engrave | Start the raster engrave process. This will start the laser. |
| Vector Engrave | Start the vector engrave process. This will start the laser. |
| Vector Cut | Start the vector cut process. This will start the laser. |
| Stop | Stop the running laser job. Pressing this button will pause sending the current job data to the laser and pop up a dialog box asking if you want to cancel the remainder of the job. The laser head may not stop instantly because there is some data that has already been sent to the laser controller board. The laser will finish running the data it has received before it stops. |
| Item | Description |
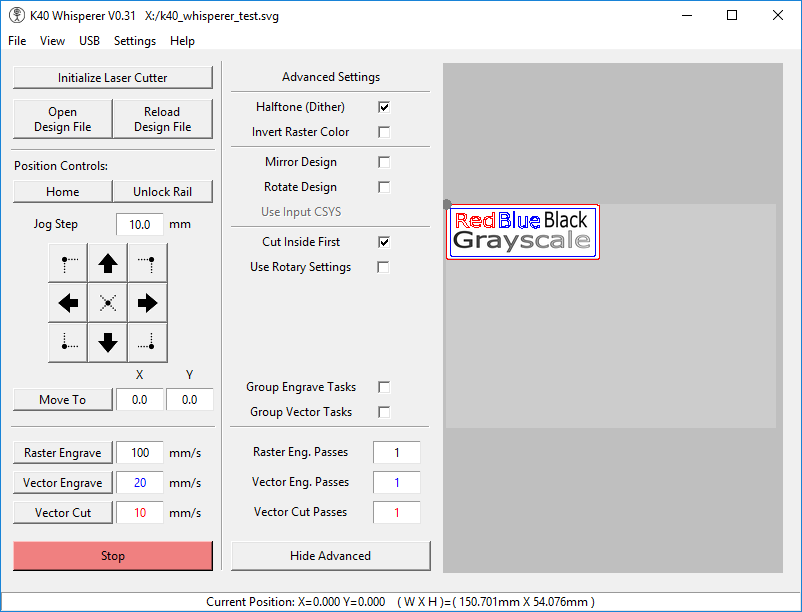
| Halftone (Dither) | Turn on or off halftone (dither). Turning this option on tells K40 Whisperer to convert any input grayscale images into dots that are spaced to approximate a grayscale image when engraved. This is similar to the process used to produce images for newsprint. The stock controller board does not have the capability to control the laser power so dithering is the only way to get grayscale images using the stock controller. You can also dither the image before loading it into K40 Whisperer, in that case you would want to have dithering turned off in K40 Whisperer. |
| Invert Raster Color | Inverts the colors in the raster image. This has the effect of turning the raster image into the negative of the original image so white is black and so on. |
| Mirror Design | Mirrors the input design. This option is useful for making stamps or engraving on the back of mirrors. |
| Rotate Design | Simple rotate the input design by 90 degrees. |
| Use Input CSYS (coordinate system) | This option causes the reference point for a design to be the origin of the coordinate system of the input DXF file. |
| Cut inside First | When this option is on the paths that are inside of other closed paths will be cut first. This is important sometimes because if the outside part is cut first it can fall out or shift on the cutting table resulting in a misaligned cut for the internal features if they are cut after the outside features. |
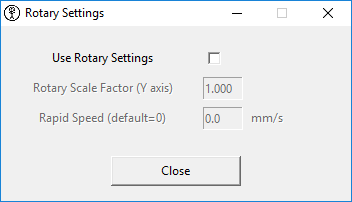
| Use Rotary Settings | This option causes K40 Whisperer to use the settings in the rotary settings window intended to be used with a rotary devices attached to the y-axis connector on the controller board. |
| Group Engrave Tasks | This option combines the buttons for the raster and vector engraving tasks so both tasks are performed with one button click. If the "Group Vector Tasks" is also selected all three buttons are combined into one. |
| Group Vector Tasks | This option combines the buttons for the vector engraving and cutting tasks so both tasks are performed with one button click. If the "Group Engrave Tasks" is also selected all three buttons are combined into one. |
| Raster Eng. Passes | Set the number of time to repeat the raster engrave paths. |
| Vector Eng. Passes | Set the number of time to repeat the vector engrave paths. |
| Vector Cut Passes | Set the number of time to repeat the vector cut paths. |
| Hide Advanced | Button to hide the advanced options pane. |
| Item | Description |
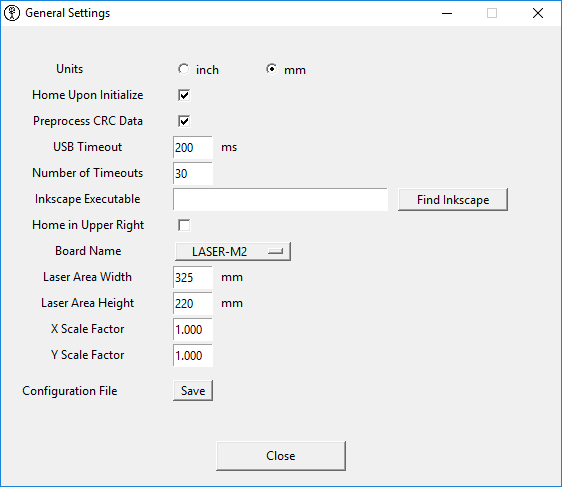
| Units | Set the working units. |
| Home Upon Initialize | This option determines if the laser will move to the home position when the laser is initialized. If Home Upon Initialize is turned off the laser will remain in the current location when it is initialized and the rail will be unlocked. The only indication that the laser properly initialized will be that a message in the status bar will say the rail successfully unlocked. |
| Pre-process CRC Data | For each packet of data sent to the laser a Cyclic Redundancy Check (CRC) code is sent to ensure the data is received correctly by the controller board. By default the CRC data is calculated before K40 Whisperer starts sending data to the laser. If you un-select this option you may save time by having the CRC data calculate on the fly. There is a chance the laser might pause (especially at the beginning of the job.) but the cutting and engraving should not be affected by the pauses. |
| USB Timout | Set the length of time to wait for a response before a timeout is registered. As I write this it occurs to me that 2000 ms is a long time for a default timeout. This could be 200 or 100 ms. Generally this should not be changed by the user. |
| Number of Timouts | This is the number of timeouts before a stern warning about timeouts will appear in the status bar. This also affects how many timeouts are allowed before a warning is issued about losing connection with the laser after data was sent. (Prior to version 0.21 this value would affect how many timeouts were recorded before K40 Whisperer gave up sending data. As of version 0.21 K40 Whisperer should just continue to try until the user cancels the job. This does not affect the error generated during manual jog moves. |
| Inkscape Executable |
The path to the Inkscape executable file "inkscape.exe". Unless your computer has a special Inkscape installation you should leave this entry blank. K40 Whisperer will search the typical install locations for Windows and Linux. These are the locations that will be searched: C:\Program Files\Inkscape\inkscape.exe C:\Program Files (x86)\Inkscape\inkscape.exe /usr/bin/inkscape /usr/local/bin/inkscape If your Inkscape executable is not in one of these locations you will need to enter the full path to the executable file. Entering the path to a link to the file will not work in Windows (i.e. don't try to link your desktop icon.) In Linux you can find the location of the executable by typing "which Inkscape" in a terminal window. In Windows you can right click on your desktop icon and select properties. Then navigate to the executable. When you know the location of the executable you can use the Find Inkscape button to navigate to the executable and the path text will be entered in the entry field. |
| Home in Upper Right | Some lasers home in the upper right corner rather than the more common upper left corner. If your laser homes in the upper right corner you will want to select this option otherwise all of your engravings will come out mirrored and the jog buttons will be reversed. |
| Board Name |
This option selects the version of the Lihuiyu controller board that you have installed in your laser. You can look at your board and find the writing that says "6C6879-LASER-xx" where xx is the version of you board and select the option from the drop down menu that matches most your board version. If you have a HT Master5, HT Master6, HT-XEON5 or HT-XEON-DRV I think you should choose LASER-M2. If you choose the wrong board the speeds will not be correct.
List of the supported boards: - 6C6879-LASER-M2 (M2 Nano) - 6C6879-LASER-B1 - 6C6879-LASER-M1 - 6C6879-LASER-M - 6C6879-LASER-B - 6C6879-LASER-B2 - 6C6879-LASER-A - HT Master5 (use LASER-M2 setting) - HT Master6 (use LASER-M2 setting) - HT-XEON5 (use LASER-M2 setting) - HT-XEON-DRV (use LASER-M2 setting) Boards that are not supported: - Moshi boards are not supported. - Cohesion 3D boards are not supported. - Boards that take G-Code as input are not supported. - Boards that do not work with Laser Draw. are not supported. |
| Laser Area Width | The value sets the usable laser width or size in the X-axis for your laser. This sets the size of the area displayed in the main window. |
| Laser Area Height | The value sets the usable laser width or size in the Y-axis for your laser. This sets the size of the area displayed in the main window. |
| X Scale Factor | The scale factor scales the output of your laser by the value entered. You might need to use the scale factor if you replace the pulley and belt on your X-axis. For example if you replace the belt and find that when you make a line that is 5 inches long in Inkscape but the output is 4.5 inches you would need to change the scale factor to 5.0/4.5 = 1.111. |
| Y Scale Factor |
The scale factor scales the output of your laser by the value entered. You might need to use the scale factor if you replace the pulley and belt on your Y-axis. For example if you replace the belt and find that when you make a line that is 5 inches long in Inkscape but the output is 4.5 inches you would need to change the scale factor to 5.0/4.5 = 1.111.
You can also use the Y-Scale factor to accommodate the use of a rotary axis. Since you will need to plug the rotary axis into the Y-axis motor driver. You will also likely need to change the scale factor so that the Y-Axis moves the correct amount when rotating the rotary axis. Similar to the example above the rotary axis adjustment can be determined by engraving a vertical line 1 inch long then measuring the line. You divide the input length by the actual engraved length around the circular object to get the scale factor. (input length)/(engraved length) = Needed Scale Factor Make sure the scale factor is set to 1.0 before performing the test described above. |
| Configuration File (Save Button) |
The Save button will save all of the current settings to a configuration file. The configuration file will be read when you open K40 Whisperer in the future and your current settings will be remembered. Whenever you want to change the defaults settings you can click the save button again and your default settings will be updated.
The location of the settings file is your home directory in a file named "k40_whisperer.txt" If you want to go back to the default settings for K40 Whisperer you can delete the configuration file and all of your settings will revert back to the default settings the next time you open K40 Whisperer. |

| Item | Description |
| Scanline Step | The distance the between scan-lines or the distance the laser will move in the Y axis between passes for raster engraving. The lowest value that can be entered is 0.001". The units for this entry are always inches. |
| Engrave Bottom Up | Raster engrave from the bottom of the image to the top of the image. This is useful to prevent smoke marks in previously engraved areas for some materials. |
| Halftone (Dither) | Turn on or off halftone (dither). Turning this option on tells K40 Whisperer to convert any input grayscale images into dots that are spaced to approximate a grayscale image when engraved. This is similar to the process used to produce images for newsprint. The stock controller board does not have the capability to control the laser power so dithering is the only way to get grayscale images using the stock controller. You can also dither the image before loading it into K40 Whisperer, in that case you would want to have dithering turned off in K40 Whisperer. |
| Halftone Resolution | This setting sets the size of the dots (pixels) used in the Halftone (Dither) operation. Lower resolution results in bigger dots (pixels). |
| Slope, Black (Default Value = 2.5) |
This is the ratio of the output level vs the input level on the dark end of the grayscale spectrum.
Increasing this value will make the darker areas of the image get darker at a faster rate but but more of the image will remain lighter.
If a lot of your image appears too dark you can increase this value.
A value of 1.0 is no adjustment. The K40 Whisperer default has some adjustment based on my experimenting. |
| Slope, White (Default Value = 0.50) |
This is the ratio of the output level vs the input level on the white end of the grayscale spectrum.
Decreasing this value will result in the lighter parts of the image become lighter at a slower rate as you approach the white side of the grayscale spectrum.
A value of 1.0 is no adjustment. The K40 Whisperer default has some adjustment based on my experimenting. |
| Transition (Default Value = 3.5) |
Adjusts how sharp the transition between the SLope, Black and Slope, White is in the mid-tones.
This setting determined how abruptly the transition from the black slope to the white slope occurs. The larger the number the sharper the transition. (The default value was determined through experimentation with various materials.) |
| Item | Description |
| Use Rotary Settings | This option causes K40 Whisperer to use the settings in the rotary settings window intended to be used with a rotary devices attached to the y-axis connector on the controller board. |
| Rotary Scale Factor (Y axis) |
This is the scale factor applied to the y-axis inputs to adjust the output for use on a rotary device. Since you will need to plug the rotary axis into the Y-axis motor driver. You will likely need to change the scale factor so that the Y-Axis moves the correct amount when rotating the rotary axis. The needed scale factor can be determined by engraving a vertical line 1 inch long then measuring the length of the engraved line. You divide the input length by the actual engraved length around the circular object to get the scale factor. (input length)/(engraved length) = Needed Scale Factor Make sure the scale factor is set to 1.0 before performing the test described above. |
| Rapid speed (default=0) | This option can set the rapid speed when the rotary settings are enabled. It is common for the high default rapid speeds to cause items on a rotary device to jump off of the rollers. With this option the rapid speeds can be reduced to prevent this. |
| Item | Description |
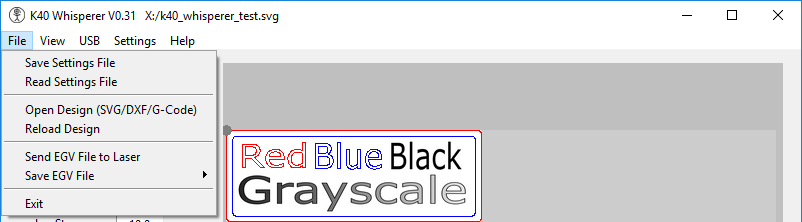
| Save Setttings File | Opens a dialog box to save a file to write the current settings to. The settings file will contain all of the settings as they are when the settings file is saved (including the name and location of the active design file.) |
| Read Settings File | Opens a dialog box to select a file to read the settings from. A settings file previously saved from K40 Whisperer can be opens to recover all of the settings as they were when the settings file was saved (including the name and location of the active design file at the time of the save.) |
| Open Design (SVG/DXF/G-Code) |
Opens a dialog box to select a design file to open.
K40 Whisperer can open SVG, DXF and G-Code files using file open. |
| Reload Design | Reloads the current design. (Re-read the design file information from the storage location) |
| Send EGV File to Laser |
Open a file open dialog to select an EGV file to send to the laser controller. The raw data is not interpreted by K40 Whisperer so there is no preview of the data to be sent to the laser.
EGV files contain the raw data that the controller board accepts as input. EGV files can be generated by K40 Whisperer or by Laser Draw (LaserDRW). EGV files can be used for repetitive tasks to avoid the time required to generate the EGV data. EGV Files generated by K40 Whisperer can also be sent to the laser using Laser Draw (LaserDRW). |
| Save EGV File - Raster Engrave | Save the Raster Engrave data to an EGV file. The file will contain the data that would be sent to the laser if the Raster Engrave button was pressed. |
| Save EGV File - Vector Engrave | Save the Vector Engrave data to an EGV file. The file will contain the data that would be sent to the laser if the Vector Engrave button was pressed. |
| Save EGV File - Vector Cut | Save the Vector Cut data to an EGV file. The file will contain the data that would be sent to the laser if the Vector Cut button was pressed. |
| Save EGV File - G-Code Operation | Save the G-Code Run data to an EGV file. The file will contain the data that would be sent to the laser if the G-Code Run button was pressed. |
| Exit | Exit the program. A dialog box will open to confirm. |
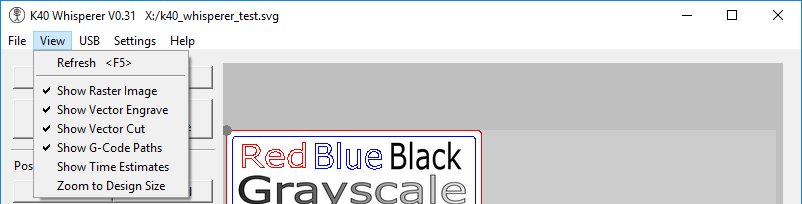
| Item | Description |
| Refresh | Refreshes items displayed in the main window. |
| Show Raster Image | Toggle the Raster image display on and off. If the display is turned of the data still exists and the Raster Engrave button will still function. The data is just not displayed which may help make the program run faster. |
| Show Vector Engrave | Toggle the Vector Engrave line display on and off. If the display is turned of the data still exists and the Vector Engrave button will still function. The data is just not displayed which may help make the program run faster. |
| Show Vector Cut | Toggle the Vector Cut line display on and off. If the display is turned of the data still exists and the Vector Cut button will still function. The data is just not displayed which may help make the program run faster. |
| Show G-Code Paths | Toggle the G-Code line display on and off. If the display is turned of the data still exists and the G-Code Run button will still function. The data is just not displayed which may help make the program run faster. |
| Show Time Estimates | Toggle the display of time estimates on and off. When one the time estimates for the various operations will be displayed in the lower right corner of the main window. The estimates should be considered rough estimates. The Vector Cut and Vector Engrave estimates are better than the Raster Engrave estimate. The raster engrave estimate assumes the whole page area is raster engraved so it is generally an upper bound on the time required to raster engrave a given design. |
| Zoom to Design Size | Zoom to the input design size rather than the working area of the laser. This allows for closer inspection of the input design. This is especially useful for small designs. |

| Item | Description |
| Reset USB |
Reset the USB port.
It might help to release and or reset the USB port before reinitializing if the controller board been disconnected. |
| Release USB |
Disconnect the laser controller board.
It might help to release and or reset the USB port before reinitializing if the controller board been disconnected. |
| Initialize Laser | Establish connection with the laser controller board, and optionally Home the laser depending on the setting in the General settings window for "Home Upon initialize" |

| Item | Description |
| General Settings | Opens the General Settings window. |
| Raster Settings | Opens the Raster Settings Window |
| Advanced Settings | Shows (or hides) the Advanced Settings in the main window. |

| Item | Description |
| About (e-mail) | Open a window that identifies the program as K40 Whisperer and lists a contact e-mail address and the Scorch Works web address. |
| K40 Whisperer Web Page | Opens a new browser window with the K40 Whisperer web page. |
| Manual (Web Page) | Opens a new browser window to the K40 Whisperer Manual web page. |
