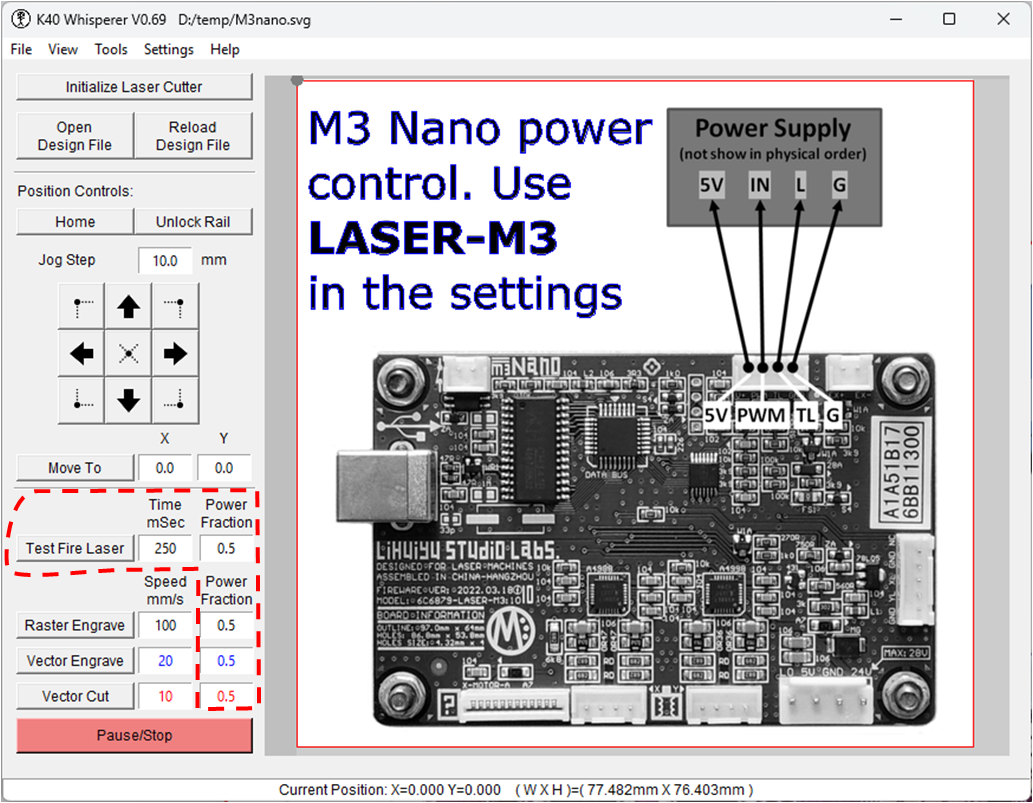
Category Archives: Laser

K40 Whisperer Error

K40 Whisperer – Input SVG File Errors

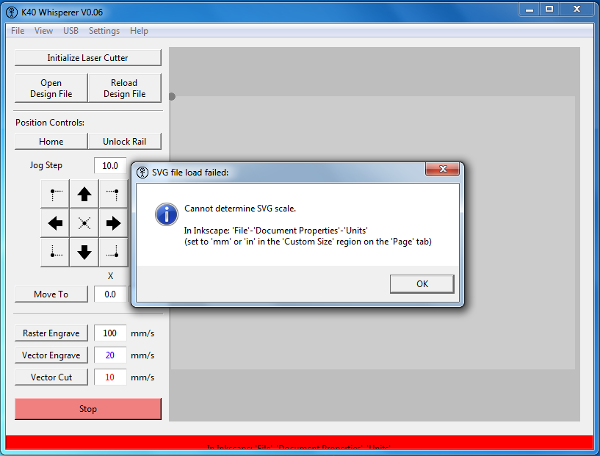
K40 Whisperer is a bit finicky about the SVG files that it will accept.  If you are importing files from sources other than a recent version of Inkscape (v.91 or v.92) you will likely be confronted with an error indicating that the SVG scale cannot be determined (i.e. “Cannot determine SVG scale.”).  This error or an error indicating that the  “Units not set in SVG File” is displayed when K40 Whisperer does not have enough information to conclusively determine the intended physical size of the design in the SVG file. K40 Whisperer attempts to provide some guidance to assist in getting the SVG file into a format with the needed information. However, the information provided is sometimes incomplete.  I am working toward making K40 Whisperer more flexible with respect to the file formats it will accept but until that task is completed here are a couple of procedures to make your SVG files work with K40 Whisperer.

Procedure Option A:

    1. Open a new SVG file in Inkscape V.91 or newer.
    2. Select “File”-“Import” to import the SVG design you want to use.
    3. Format the page size as needed (usually done by selecting “File”-“Document Properties”-“Resize page to drawing or selection”)
    4. Verify the “Units” are set to “mm” or “inches” in the “Custom Size” section of the “Page” Tab in the Document properties
    5. Save the new SVG file.

Procedure Option B:

    1. Open the SVG file you want to use in Inkscape V.92 or newer
    2. Selecting “File”-“Documents Properties”
    3. On the “Page” tab locate the “Scale x:” value and note the value.  Change the value to another number and press enter.  The new value can be anything.  (Increasing the value by a small number like .001 makes it easy to change it back in the next step.)
    4. Change the “Scale x:” value back to the original value and press enter.
    5. Verify the “Units” are set to “mm” or “inches” in the “Custom Size” section of the “Page” Tab in the Document properties.
    6. Save the SVG file.

These procedures will each result in an SVG file that contains the necessary information to indicate the real physical size intended for the SVG file. This information is partially encoded in the viewbox attribute which is added to the SVG file when either of these procedures are followed.

Color and Text

K40 Whisperer – Vector Colors and Text

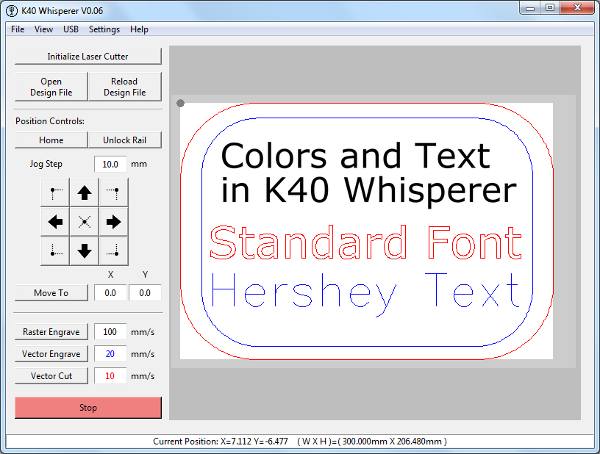
In K40 Whisperer the red and blue vector paths in SVG files are converted to vector cut and vector engrave paths respectively.  A few people have experienced problems getting the red and blue lines to come into K40 Whisperer properly.  Here are a few of the common pitfalls that people encounter when reading SVG files into K40 Whisperer.

1. Blue and red colors in images are not converted to vectors.

If there is an image in the SVG file that contains blue or red the colors in the image are not recognized as a vector cut or engrave feature because the colored portion of an image is raster data not SVG path data.  K40 Whisperer does not convert raster images to paths. If you want to convert a raster image to vector engrave or cut paths you can use the bitmap trace feature in Inkscape  to convert bitmap image to paths before sending the SVG file to K40 Whisperer.  The trace bitmap feature in Inkscape is located in the menu bar under “Path”-“Trace Bitmap”.

2. Fill colors are not interpreted as vectors; only the stroke colors for objects are converted to vector cut/engrave paths.

Shapes/lines in SVG files have fill colors and stroke colors.  Only the stroke colors are interpreted as vector cut/engrave features.  K40 Whisperer does not try to convert the filled portion of a shape to a vector path.

3. Text is a special kind of object usually defined by fill color.  Text stroke color needs to be set in order to be interpreted as vector data.

Although text may look like strokes (depending on the font) generally standard fonts consist of outlines that are filled with a color.  So if you want to vector cut/engrave a standard font you need to change the stroke color for the font, then you can vector cut/engrave the outline of the font.   If you don’t want to cut/engrave the outline of characters you will need to use a special font that consists of strokes not outlines, these fonts are commonly referred to as stick fonts.  There are a variety of stick fonts available in the Inkscape Extension for Hershey Text.  To access the Hershey Text fonts in Inkscape go to “Extensions”-“Render”-“Hershey Text…”.  You can use the dialog that opens to create the text then change the stroke color to red/blue to engrave/cut.

K40 Whisperer will convert text to paths for you when the design is loaded.  However if the font used in a design is not installed on the computer running K40 Whisperer.  The intended font may be swapped out for another font automatically.  This can dramatically change a design in some cases.  To avoid the possibility of the design changing when it is brought to a new computer you can convert the text to paths in Inkscape.  To convert the text to paths in Inkscape use the menu options “Path”-“Object to Path”.  After the text is converted to paths the font will no longer be referenced and the design will be defined by the shape of the original font.

k40whisperer_thumb

K40 Whisperer– K40 (Cheap Chinese Laser) Control Software

After months of reverse engineering I am happy to announce that the initial version of K40 Whisperer is available for download under the GPL License.  K40 Whisperer is software written to interpret SVG and DXF data and in turn communicate the design information to the K40 Laser Cutter (using the stock M2 Nano Controller board).  This software is essentially a replacement for the Laser Draw (LaserDRW) software that comes with the stock K40 laser.  When using K40 Whisperer the USB key that is required for Laser Draw is not required.  The initial release only supports the M2 version of the K40 controller board.  If I can get other K40 owners to test with other versions of the controller board future versions will support more board versions.

K40 Whisperer has been tested with Windows (XP, Vista and 10) and Linux.  It should also work on a modern MAC computer, although this has not been tested.  Full instructions for setting up K40 Whisperer are available on the K40 Whisperer web page.  Linux instructions have not yet been written.

K40 Whisperer attempts to solve some of the basic problems with Laser Draw such as the difficulty with properly scaling designs and combining engraving and cutting on one work piece.  A previous attempt at solving these problems was the Laser Draw Inkscape Extension which allows users to send data from Inkscape to Laser Draw.  This Inkscape extension is also available on the Scorch Works web page.

Below is a screen video providing an overview of the operation of K40 Whisperer.

Laser Draw Inkscape Extension for K40 Laser Cutters

A couple of months ago I wrote an Inkscape extension that allows users to save LYZ files that are compatible with Laser Draw (LaserDRW).  Laser Draw is the software that comes with many of the cheap chinese laser cutters.  The Inkscape extension makes it easier for users to get consistently scaled output.  This is especially helpful when doing multiple operations on a single work piece (i.e. raster engraving, vector engraving and cutting).

The Inkscape Extension is free and open source (GPL).  The extension is available for download on its web page: Laser Draw Inkscape Extension.

On the ScorchWorks YouTube Channel there are a couple of relevant videos.  The first video talks about the extension and goes through making a design from scratch in Inkscape.

The second video walks through modifying an existing design for use with the Inkscape extension.

Spring Loaded K40 Laser Platform

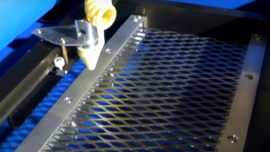
I built a spring loaded platform for my K40 laser.  The purpose of the platform is to allow for the use of different thicknesses of material while maintaining the correct distance to the surface of the material so the laser is always focused at the material surface.  I achieve this by having springs push the platform up to a hard stop formed by a piece of angle aluminum.  When an item is placed on the platform a small portion of the material is pushed under the hard stop surface.  Then the springs push the material up until the top surface of the material is positioned at the laser focus height by the hard stop.

I don’t have detailed plans but I tried to give enough information in the video for someone to replicate the design if desired. Below is a list of the materials I used and the tools needed to perform the build.

If you have questions I can be contacted by e-mail at the address in the image at the bottom of the Scorch Works Home Page.

Materials used:

  • Aluminum flat bar, 1 inch x 1/8 inch x 36 inch long  (Home Depot has 48 inch lengths)
  • Angle aluminum, 1 inch x 1/8 inch x 36 inch long  (Home Depot has 48 inch lengths)
  • Angle aluminum, 3/4 inch x 1/8 inch x 36 inch long  (Home Depot has 48 inch lengths)
  • (Qty 4)  Spring, 3/8 in diameter,1-7/8 inch long, 0.025 wire diameter   (From local hardware store)
  • (Qty 8) Machine screw, 10-24 x 2-1/2 inch long
  • (Qty 8) Machine screw, 6-32 x 3/4 inch long (for holding brackets to rails and 3D printed parts to the top brackets)
  • Drinking straw to cover the threads on four of the 10-24 screws (optional, but nice to have)
  • (Qty 4) 3D printed standoffs to set the height of the angle aluminum hard stops (these could be replaced by small diameter pipe or tube cut to length or a small piece of wood with holes drilled)
  • (Qty 4) 3D printed spacers to extend the travel of the springs (these could be replaced by small diameter pipe or tube cut to length or a small piece of wood with holes drilled)
  • Expanded metal sheet, 1/2 inch x 12 inch x 24 inch (Home Depot)

The 3D printed part models are available here:  spring-loaded-laser-platform

Tools Needed:

  • Screw driver
  • Hand Drill
  • Set of Drill bits
  • Hacksaw (or metal cutting band saw)
  • 10-24 Tap
  • 6-32 Tap